
Application – Expenses tab
The Expenses section gives the business an overview of the applicant’s expense submitted in the loan application form.

![]()
1. Action/Edit Expenses
The ‘EDIT‘ feature allows you as the user, to manually update the application based on how you need to. In the Nimo system, almost everything is editable for the user. In the Expenses edit menu in Nimo, the following expenses can be updated:
- Uncategorised Debits
- Yes
- No
- If yes – New $ Value (per month)
- Telecommunications
- Yes
- No
- If yes – New $ Value (per month)
- Utilities
- Yes
- No
- If yes – New $ Value (per month)
- Gyms & other memberships
- Yes
- No
- If yes – New $ Value (per month)
- Retail
- Yes
- No
- If yes – New $ Value (per month)
- Insurance
- Yes
- No
- If yes – New $ Value (per month)
- Groceries
- Yes
- No
- If yes – New $ Value (per month)
- Rent
- Yes
- No
- If yes – New $ Value (per month)
- Subscription TV
- Yes
- No
- If yes – New $ Value (per month)
- Vehicles and Transport
- Yes
- No
- If yes – New $ Value (per month)
- Department Stores
- Yes
- No
- If yes – New $ Value (per month)
- Personal Care
- Yes
- No
- If yes – New $ Value (per month)
- Travel
- Yes
- No
- If yes – New $ Value (per month)
- Health
- Yes
- No
- If yes – New $ Value (per month)
- Entertainment
- Yes
- No
- If yes – New $ Value (per month)
- Home Improvement
- Yes
- No
- If yes – New $ Value (per month)
- Pet Care
- Yes
- No
- If yes – New $ Value (per month)
- Dining out
- Yes
- No
- If yes – New $ Value (per month)
- Education & Childcare
- Yes
- No
- If yes – New $ Value (per month)
2. Required/Provided
This section displays the applicant’s responses to the loan application form, specifically in relation to the loan product. The user can edit each individual question on the form, and you can also choose between making the question ‘required’ or ‘optional’ for the customer to answer.
- Required – shows whether a question is mandatory. If this field is checked, then the ‘Provided‘ field must be completed, otherwsie it will spawn a blue bubble indicating something is still required. If the required box is unticked, it is optional for this to be provided.
- Provided – shows whether the applicant has answered the question.
- Colour Indicators –
- If both fields are green, it means all mandatory questions have been answered.
- If either field is red, it indicates that required details are still missing.
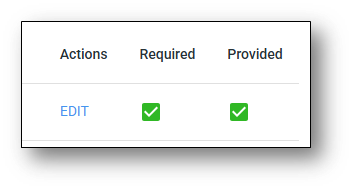
! IMPORTANT: If the user wants to update any information, they can do so by clicking the edit icon under the Actions column.
3. Change Log
All changes made by the user will be recorded in the change log for tracking and audit purposes. The details recorded in the change log are as follows:
- The User that made the change
- The Date & Time of the change
- The Attribute that was changed
- The previous value before the change, the Old Value (appears in red)
- The new value after the change, the New Value (appears in green)
- The Reason if one was provided

![]()
Frequently Asked Questions
1. Why can I not edit some of the expenses for my customer?
Your customers expenses have most likely been populated from the the customer bank statements when they were scanned by the Nimo system.